Search and filtering
DxVisualizer has three separate finders. Each one narrows a different thing, and they do not affect each other.
| Finder | Where it is | What it narrows |
|---|---|---|
| Global search | Header row, next to the Settings button | Objects of every tracked type |
| Type filter | Above the namespace list | Type rows in the left panel |
| Label filter | Below the object list header | Objects of the selected type |
Global search
The search box sits in the window header row, above all three panels. It is not part of the Objects panel, and it does not search only the type you have selected.
Type a term and a popover opens with the matches. Each result shows the object's name and its type name. When the term matched something other than the name, type name, or GUID,
the result also shows up to two field: value lines naming the fields that matched, so you can tell why an asset is in the list.
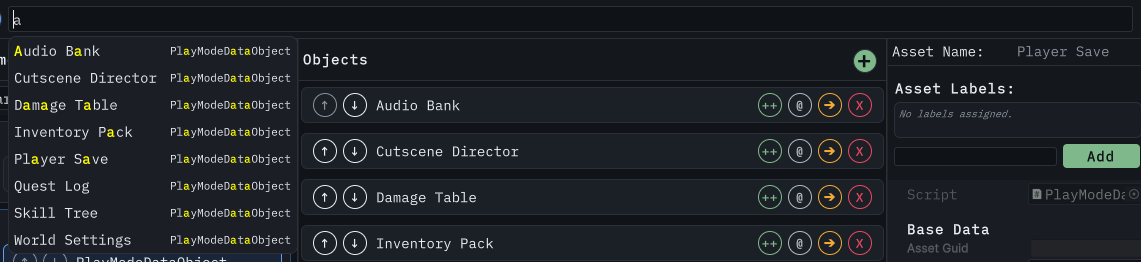 Global search over every tracked type.
Regenerated from the live window by the docs capture pipeline.
Global search over every tracked type.
Regenerated from the live window by the docs capture pipeline.
What it matches
Each space-separated term is matched on its own, and an object matches when any one of its terms matches somewhere. A term is checked against, in order:
- the asset name,
- the type name,
- the asset GUID, as an exact match,
- string fields on the asset and on nested plain objects.
Field matching is checked only when a term has not already matched the name, type name, or GUID, and it stops at the first field that matches, so a result names one matching field per term rather than every match.
Field matching is case-insensitive. It skips primitives, Vector2, Vector3, Vector4, Quaternion, Color, Rect, and Bounds, and it does not follow references to other
Unity objects or assets. Cycles in nested plain objects are tracked, so a self-referencing structure terminates.
Matching terms are highlighted in the results. The highlight deepens while the pointer is over the row.
Limits and behavior
- The popover lists at most 25 results. The list stops there; there is no "show more".
- Results are ordered by asset name, then by full type name, both ordinal.
- Searching covers every tracked type, so a hit can be in a type you have not selected yet. Selecting a result switches to that object's type when needed and selects it there.
- The first search after the window opens can show Building search index…. The index loads in the background; when it finishes, the current query is re-run and the results appear. The popover stays open instead of dismissing your query.
- A query with no matches shows No matching objects found.
- Up and Down move the highlight and wrap around. Enter or Return opens the highlighted result. Escape closes the popover and keeps your text.
Type filter
The field above the namespace list narrows the type rows by display name, without case sensitivity. Namespace headers are not filtered, so you keep the structure while the types inside it narrow.
A display name comes from [CustomDataVisualization] when your type sets TypeName; otherwise it is the C# type name. Every space-separated term must match the display name.
Label filter
Labels are Unity asset labels, the same ones you see on an asset in the Project panel. The filter has three rows:
- Available lists every label used by an instance of the selected type.
- AND: and OR: are drop targets.
Drag a label pill from Available into AND: or OR: to filter, and drag it back out to remove it. Drag labels between the two rows to change which clause they belong to.
AND and OR
The AND && / OR || switch above the OR row picks how the two clauses combine.
In AND mode an object must satisfy every clause that has labels. An empty clause adds no constraint.
In OR mode an object must satisfy at least one clause that has labels. An empty clause never counts as a match. This matters: if you only fill the AND row and switch to OR, nothing matches, because the empty OR clause is not a pass.
Labels compare exactly, so Urgent and urgent are two different labels.
The Advanced row
Advanced reveals the AND/OR switch and the OR row. The row refuses to collapse while you are in OR mode or while any OR label is present, so a filter you cannot see is never left behind hiding objects. The Labels header above the whole section refuses to collapse while any label is configured.
What filtering changes
The filter narrows the list you see. It does not change what is on disk, and it does not change the order of the objects it keeps.
When a filter hides rows, a line below the filter reports how many: fewer than 20 hidden is highlighted in yellow, 20 or more in red. When nothing is hidden, the line disappears.
The filter is stored per type and follows the persistence setting described in Organizing your data.
Label editing
The inspector panel for a selected asset has an Asset Labels section. Type a label and press Add, or press Enter, to attach it. The field suggests labels already used in the project, and you can move through the suggestions with the arrow keys. Each attached label has a remove button.
Adding a label the asset already has is a no-op. Adding or removing a label saves the asset, refreshes the label cache, and re-applies the current filter, so you see the effect immediately.
Label editing is package-driven asset editing, so it is refused during the Play Mode pause described in Managing assets.
Next steps
- Managing assets — create, rename, move, clone, delete, and run processors.
- Organizing your data — ordering, layout, and persistence.
- Extending the window — attributes,
BaseDataObject, processors, and custom inspector content.
Refresh the published search image
After reviewing a regenerated docs/images/data-visualizer-search.png, refresh its WebP companion from the repository root. This verifies every decoded pixel before writing:
uv run --with Pillow==12.3.0 python - <<'PY'
from io import BytesIO
from pathlib import Path
from PIL import Image
source = Path("docs/images/data-visualizer-search.png")
with Image.open(source) as image:
    pixels = image.convert("RGBA")
    encoded = BytesIO()
    pixels.save(encoded, format="WEBP", lossless=True, exact=True, quality=100, method=6)
    with Image.open(BytesIO(encoded.getvalue())) as decoded:
        assert decoded.size == pixels.size
        assert decoded.convert("RGBA").tobytes() == pixels.tobytes()
    assert len(encoded.getvalue()) < source.stat().st_size
    source.with_suffix(".webp").write_bytes(encoded.getvalue())
PY